Thursday, April 27, 2017

Joy Clair- God's Army

I may never march in the infantry, ride in the cavalry, shoot the artillery,  I may never fly over enemies but I'm in the Lord's Army. Brings me back to 3-11 years old going to church at Grace Missionary Baptist in North Miami, FL. Mrs. Mary was the pastor's wife and taught the children's program. This was a song I always chose when it was singing time. When I first saw this stamp set, this song hit my brain, and as I worked on this project I did sign it. How many of you sang along as you read the words?
16729481_10154154080057854_4113569861193100270_n
This project I knew right away was going to be a shaker card, and I had, in my opinion, to do it in patriotic Red, White, and Blue.
17353558_10155864693810329_752396823840909386_n
To create this card I started out with the SVG file. I arranged the images the way I wanted them on the computer screen and cut with the scan n cut. I then sent another page through to cut the boots.
I positioned the background page for my card in my stamping tool with the negative from the SVG cut, as this is what I was going to use as my top panel, and was able to line it up with the background. I then lined each stamp up in its proper space and stamped in Ladybug Red and Denim Blue, both from Ranger.
I used powertape to attach a sheet of acetate to the inside of the top panel, then used foam tape to close off each section so that the sequins would stay in their own little lakes. I then used "patriotic" sequin collection from Kat Scrappiness to put in each little lake.
I put the sequins on the proper sections by color then attached the top panel to the back.  I stamped the boots with Staz-on Saddle Brown, and the sentiment using Ladybug on half and Denim on the other half to stay with the patriotic design. I opted for a Kraft card base and underlayer for the sentiment to tie in with the Saddle Brown of the boots.
I hope you have enjoyed this project, and that it inspires you to make similar projects of your own.
Until Next Time... Let's get crafting.

 Please follow Joy Clair's facebook pageColor by Faith Bible Journaling facebook pageInstagram and Twitter, be the first to hear the news, sales and giveaways! They also have a Pinterest page and Youtube channel for your inspiration!
Thank you for stopping by and please come back again soon!

CHOO CHOO... Quick Quotes and Clear Scraps

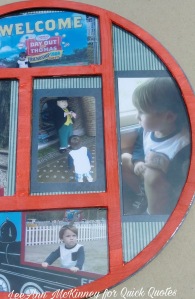
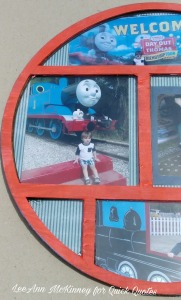
Greetings crafty friends. LeeAnn here with a collaboration post with Quick Quotes using Clear Scraps 12x12 Circle Printer Tray Frame. Let me say as soon as I saw this in the box, I knew exactly what photos I was using.

Circle Printer Tray Frame
Just a few days before my project box arrived, my daughter took my little grandson to the local Day Out with Thomas and the Friendship Tour. Little man LOVES Thomas, almost as much as he loves monster trucks, and he looked so happy that day. It was really hard to pick which photos to use, but with the help of my Selphy CP1200 printer, I was able to print not only 4x6 photos but also a 2x3 sticker for the center rectangle.

1. Lay the bottom layer out on your workspace.

 2. I then added double stick tape to the bottom layer.
 3. I removed the protector off the double stick tape and smoothed out my Quick Quotes paper from Adventure Awaits Paper Pack QQP-AD101.
 I then put the rest of the frame together meaning 2 chipboard frame layers, 1 acrylic layer and one more chipboard frame layer on top, carefully making sure they all lined up. I used Lipstick Powder Puff Chalking Ink to make the top layer Red. However, it was soaking into the chipboard and was not as bright as I wanted.
I then decided to take the top layer and cover it with a good smattering of Gesso. Once fully dry I covered with Lipstick Powderpuff Chalking ink again. When that was dry I used Beacon 3-in-1 glue to affix all layers together.

Right Side
Left Side
Full Image. 
I can't wait to see this in my grandson's room. 

I will be purchasing some of these frames in the future from Clear Scraps, as they are quite easy to work with, and fun as well. 

I hope you have stuck with me this far and enjoyed my project today. 

I'll be back in a couple weeks with my next project, in the meantime please be sure to follow the blog so you are notified when we have another post. 
QQ Products Used:
Lipstick Powderpuff Chalk Ink
Adventure Awaits QQP-AD101
Beacon 3-In-1 Glue


Wednesday, April 26, 2017

Sunsational Crafts- Close To My Heart

Hi, there crafty friends, LeeAnn here today with a project not so easy for me to make. This is a Mother's Day card that I will be taking to the Cemetery on Mother's Day, to give to my mom. Mother's Day is 2 days after what would be my mom's 72nd birthday.

I used the Bear Love and Always Pick You sets for this project.
First I printed the two digital sets in the desired size, I then used my Scan N Cut to cut the Bear and a set of the flowers.
I then used some rectangle stitched dies to cut out the tombstone layers, and a hillside stitched to cut the lawn. I used a postage stamp die to cut out the background later. I used Summer Sky "fireworks" spray from Imagine Crafts to spritz the background.
The sentiment is from the Bear Love set and I used MS Paint to size it properly, color the background and then printed.
I used my Spectrum Noir alcohol markers to color the bear and flowers/vase. At this point, I used Kaisercraft double stick tape to adhere the background, hillside, and bear. I used my Xyron X to adhere the smaller stone cut to the larger as well as the little sentiments and the flowers. I used dimensional foam to adhere the tombstone and the sentiment and my project was complete.


I hope you have enjoyed this project. Please come back tomorrow to see what Shylaa has made for you. Please be sure to follow our blog.

Items Used:
Bear Love
Always Pink You

Spectrum Noir:
Bear: GB8/GB9, True Black, TB4 and DP1
Vase: GB8
Flowers: DR6
Stems/Leaves: LG5

Imagine Crafts: Fireworks Shimmer Spray in Summer Sky

Wednesday, April 19, 2017

Quick Quotes, Post Cards Made Easy

Greetings crafty friends. Hope everyone had an enjoyable holiday weekend. LeeAnn here with my next post for Quick Quotes.
As I sat looking through my paper, I was trying to come up with a different idea and thought... why not a post card anyone can make. I also made a video to go along with it.

So let's go on with the project...

Using Adventure Awaits paper pack page QQP-AD105 I trimmed down the map image that I wanted to use for my top layer to 3.75in x 4.75in. Turning to the backside of the same page I trimmed a layer of 4in x 5in. Last I trimmed a sheet of 110lb card stock in white to 4.25in x 5.25in.
I used double side tear tape to adhere my layers together.
Following this step, I grabbed a retired stamp set and my Stampoholic and using the Sunset Powderpuff Ink I stamped the airplane. I followed that up with grabbing my Royal Blue Powderpuff Ink and a fantastix and colored the plane in.


After I finished the video and all the editing, I remembered a HoneyBee stamp set that I had in my stash, and used two of the stamps on the back, again with the Royal Blue Powderpuff inks.

Once I had a stamp, write out the card and address it, it is ready to go. Quick and simple that anyone can make. And a little less to mail than a regular card.

Here is my process video.

[youtube=https://www.youtube.com/watch?v=7DdUfMp08n0&w=320&h=266]
Quick Quotes Supplies Used:
Adventure Awaits Paper Pack 
2017 Royal Blue PowderPuff Ink
2015 Sunset PowderPuff Ink

I hope you have enjoyed this post, please don't forget about our monthly challenge ( the theme is flowers) you still have time to enter.
Come back and visit again real soon.


Monday, April 17, 2017

Joy Clair Mothers Day Hugs and Smiles

Greetings friends and fellow crafters. LeeAnn here today with a great Mother's Day card I have created for the Joy Clair Mother's Day Showcase.

I used stamps from two of our sets for this and had quite a bit of fun making it. Stamping and heat embossing are two of my favorite things to play with, so why not. 

Hugs and Smiles
Mother's Day
   
The first thing I did was to line the corner flower image from Hugs and Smiles stamp up in the corner of my mini, I then positioned the paper in the corner and used the magnets to hold it down. I then used Versamark ink Stamped one corner, reinked and stamped again for sure coverage. I sprinkled the white embossing powder over the image and tapped off the excess. I used my heat gun to set it. I then did the same in the opposing corner by turning the paper, double inking, sprinkling and heat embossing. I then stamped Happy Mother's Day sentiment from the Mother's Day set in the middle using Ranger Archival Black Ink.

Once I was sure that was dry, I started having fun. Using sponges and 3 different PowderPuff inks (Buttercup, Cherry Blossom, and Sky Blue) I sponged the colors over the images. TO finish off I added 3 waterdrop crystals. Once the inks were dry I adhered my topper to an A2 card base.

I hope you have enjoyed this project. I had fun creating it and I am sure you will too.

Please follow Joy Clair's facebook pageColor by Faith Bible Journaling facebook pageInstagram and Twitter, be the first to hear the news, sales and giveaways! They also have a Pinterest page and Youtube channel for your inspiration!
Wednesday, April 12, 2017

Sunsational Spring Planner

Greetings crafty friends, it's LeeAnn and my turn here on the Sunsational Blog. I thought I would share my planner page for the month of April that I used some of our great images from Spring is Blooming 2.

I printed the file and used my Scan n Cut in order to cut out the images. I then used my Spectrum Noir Markers to color the images.


I then ran all the images through my Xyron X in order to make them stickers. Such a great little machine this is with pieces that can be somewhat intricate where liquid glue or a regular tape runner would be messy.

I hope you have enjoyed my project, and it inspires you to use some of our great digital images for your planner as well.

Items Used:
Washi Tape for Sky and Grass
Tree: TN3, LG3, LG5, DG1
Flower Stem: JG2
Flower Center: CT3
Sun: GB6, CT1, CT3, FL3, DR1, FS2, FS6
Worm: CG3, BT7
Eggs: FL1, FL2, FL3, BT7, JG2, BP6
Long Stems: LG5
Flowers: BP1, PL1, LV2, BT5
Duck: LY2, CT3, OR2, BT7, IG5
Squirrel: TN1, TN7, GB7
Butterfly: FL3, GT3
Bunny: BG2, FS6, TB5

Monday, April 10, 2017

Quick Quotes Spring Flowers

Greetings friends and fellow crafters. LeeAnn here with my first post of April. Spring has arrived here in Florida and with help from some of the papers from or Mulberry paper pack and my Scan n Cut, I am bringing Spring to the blog.

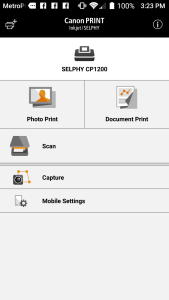
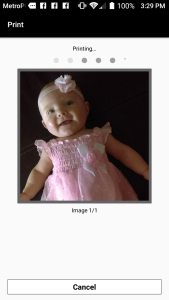
I do have to say also, I have a new printer, and WOW, the Canon SELPHY CP1200 is the BOMB. It is so awesome, it sits on my side cart, and with the Canon app on my phone, I can send any photo to the printer and boom, there it is.I remember buying my youngest daughter a photo printer back in about 2006 and this one is so much easier to use. I downloaded the Canon Print app to my Android phone and used a photo my daughter had sent me of my adorable granddaughter Juliet. I love the fact that I could do the edits required on my phone, and then send direct without having to worry about hooking up any wires.

 Step 1 click on the app
 Step 2 click photo print
 Step 3 chose images to print
 Step 4 hit PRINT
Step 5 watch it print on the printer while looking at the adorable little girl.
[youtube=https://www.youtube.com/watch?v=TC0MAekSOCI&w=320&h=266]

Once I had my photo I figured out exactly which paper I wanted to work with, and Mulberry 100, 102, and 105 won that battle. Using my Scan n Cut, and a flower design SVG, I cut the images out of the 100 and 102, with the intention of using 105 as my background. I then took the flower pieces and flipped them back and forth to use the front and backs to vary the designs of the flowers I made.
I used a piece of the 100 and 102 to make a mat for my photo. The sentiment is from Sheer Joy 12x12 Sentiment Page.


After arranging my flowers the way I wanted to put them together, my Xyron X got a workout adding adhesive, then I pieced the flowers together and arranged them on my page. I added my photo mats and image, the sentiment is on foam dots. Thinking I needed a little bling, I found a Rhinestone and Lace Embellishment in my stash and had to add it.

 After looking at it again I decided to add some Fabrika glitter glass drops to the center of each flower for that added sparkle.


One more addition was the pretty butterfly trim that is across the top from my stash dating back to 2010ish.


 Now my page is complete.

I hope you have enjoyed today's project. I will be back again soon.

Supplies Used:
Mulberry Paper Pack
Canon SELPHY CP1200 White Photo Printer
SELPHY High-Capacity Color Ink/Paper Set


Friday, April 7, 2017

Sunsational Stamps Just Ducky

Greetings friends and fellow crafters. Today I am here sharing the first project with the new design team Sunsational Stamps.


For my project today I used the ... Digital Image Set.

I used Spectrum Noir Alcohol Markers for all items other than the duck, in which I used Memento Dual Markers.

Basket: TN3, EB3
Eggs: FL1, FL2, FL3, BT7
Basket Grass: LG1, CG1, JG1
Ducks Eyes: BT7

Duck Feet/Bill: Memento Tangelo
Duck Cheeks/Wings: Memento Cantaloupe
Duck Head/Body: Memento Dandelion

Sky: PowderPuff Chalk Sky Blue
Grassy Yard: PowderPuff Chalk Jade and Seafoam

Wednesday, April 5, 2017

Joy Clair and MISTI Collaboration Hop


Greetings friends and fellow crafters. LeeAnn here today doing a collaboration with Joy Clair and My Sweet Petunia's Stamping Tool the MISTI (Most Incredible Stamping Tool Invented). The MISTI has been a game changer for many stampers since its introduction to the market in 2015. Today I am going to be using the Mini MISTI for my project.

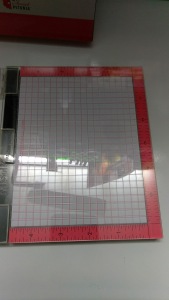
 The MISTI came nicely packaged in a cardboard shipping box with packing paper to protect it.
 After taking the MISTI out of its packing box and then brand box, it was yet again wrapped in cardboard and then plastic. You can see the two rare-earth magnets that were on the bottom.
 The mini MISTI outside dimensions are 6 x 7 while the inside workspace dimensions are 4.75 x 5, I primarly make A2 size cards so this size works for me in most cases. There are 2 others sizes that are larger, the Original (8 x 10 work area 6.5 x 8.5) and the Memory ( 13.75 x 14 with 12.25 x 12.25 workspace). Each MISTI comes with 2 magnets, Foam Pad to use when using Clear Stamps (not needed with thicker cling stamps) and a sample of grid paper (about 10 sheets).

 Each MISTI has the grid under neath the bottom of the tool, which can not be seen through the foam. Also on that bottom layer is a Bible Verse (As each has received a gift, use it to serve one another as good stewards of God's varied grace. 1 Peter 4:10)
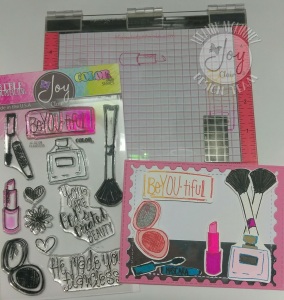
 So, on with my project. used the Joy Clair SVG file to cut out the pieces for the stamp set I chose to use. I then cut the negative to the size to fit in the MISTI.
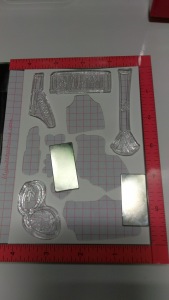
I then placed each stamp within the space that it belongs. 
 I opened the MISTI and inked up the images. I had also used this time to put the die cuts in their proper spaces.
 I then closed it down and applied slight pressure to transfer the ink to the cut. I then opened the lid, inspected my cuts, re-inked and because my pages did not move, I was able to re-stamp in the same place again.
 After inking all the pieces I wanted to use for this project, I used my Spectrum Noir Markers and colored it up. My project was then put together using red power-tape and my project was complete.

Wink of Stella Black/Silver Sharpie Metallic Gold
Spectrum Noir BT7, BT8,TB2 CR1, CR2, BP1, BP4, BP6
I hope you have enjoyed my project today. Please hop along and see all the great projects made by both teams.

Joy Clair is giving two prizes: each a $25 dollars gift card from Joy Clair Store. To participate all the readers need to leave a comment on each designer blog, including the company blogs. Winner will be announced in our Joy Clair blog at the end of the month. 


You should have come to me from Jeanne's blog, and Maureen's is next. If you started here head back up to the top and start with Ilina to make sure an get everyone. This is a longer hop that usual as we have both teams working together, please make sure to comment on each post.
Jeanne Streiff Previous
LeeAnn McKinney YOU ARE HERE!!!


Please follow Joy Clair's facebook pageColor by Faith Bible Journaling facebook pageInstagram and Twitter, be the first to hear the news, sales and giveaways! They also have a Pinterest page and Youtube channel for your inspiration!