Friday, April 26, 2019

Spring Critters April 2019 FOTM Card Kit

Spring is Here! Finally! I know some of you in the northern states and other parts of the world may not be experiencing warm weather so you can pretend with these beautiful stamps and spring papers.
 Double Dip
No photo description available.
Banana Split
No photo description available.
Our April Flavor of the Month kit is all about "Spring Critters" cute ones at that! So hop on along and get inspired to make some spring cards with this adorable kit.
Here are the cards I made... and had a lot of fun making them:
 Collection 1 Sketch 1

Collection 2 Sketch 2
Collection 3 Sketch 4
Collection 4 Sketch 3

 Head to the brand new website's Subscription page and see what we have to offer this month. Make sure to check out our Blog Hop so you can join in our Rafflecopter. 
All winners are announced each month in the Teresa Talks post on the blog on the first of the month.

Thursday, April 25, 2019

April 2018 FOTM Sneak Peek Day 4

Greetings friends and fellow Crafters, LeeAnn here with my sneak peek of the April 2019 Flavor of the Month Card Kit by Scrapping For Less.
This little guy is so fun, and with the rainbow color raindrops he is bound to not let the puddles get him down.

The Spring Critters kit is going to be fully released on Friday 4/26/2019 at  Midnight!!! Be sure to join us this weekend, and hop along to see all the designers projects with this great kit.

Want to reserve your copy today? Click here to sign up for your subscription choice today!!!

Wednesday, April 24, 2019

ScraPerfect Birthday Shaker Card

Greetings friends and fellow crafters. LeeAnn here with a Birthday shaker card and gift card holder that I have made for a friend I am getting together with soon.

So, not sure about you, but I am a collector of crafty goodness. I have had all the makings for this card for over a year, and have finally decided to put it to use. 

 First I gathered the main parts of the card I would need. Everything is by JilliBean Soup except the peach cardstock. 

I stamped the balloon in the space provided in the tag, and die cut two sheets of cardstock using my stitched rectangle dies. I had cut a small piece of the peachy color for inside the tag as well, which is what I stamped the balloon image on.

Once I had all that together I went about assembling my card. And pulled out my Best Glue Ever, Perfect Crafting Pouch, 2 tiny bottles of glitter that matched my color scheme and Embellie Gellie (although I ended up not using this).
I swiped the inside of the balloon with the perfect crafting pouch, and poured in some of each bottle of glitter. I then fit that through the hold in the tag and peeled off the backing to have it stick to the panel with the balloon image. I then used a piece of hemp cord to tie the tag closed, before giving this to my friend I will add a gift card to the inside back of this tag. It is perfect size. Just a little Embellie Jellie will hold it too.
I then adhered all my layers using the Best Glue Ever, and attached them to an a2 card top folding card base. I then decided it needed a bit more, so using Pistachio Memento Ink I stamped the stars around the tag to complete the look.

I hope you have enjoyed this project today, as much as I have enjoyed sharing it with you.

Listing of products used in this project from ScraPerfect.

Sunday, April 21, 2019

2 Birthday Crafty Product Reviews

Hey there friends and fellow crafters... first of all Happy Easter...
Now I don't usually do product reviews, but I wanted to say, I am IN LOVE with the Wendy Vecchi "Make Art Station". 
Wendy Vecchi Make Art Stay-Tion All-in-One Magnetic Surface
I am a LAZY crafter, well I have swelling issues in my legs, and sometimes my neck hurts, so when I am coloring I tend to get comfortable and this product is perfect... the magnetic ruler holds my paper to the board and I can just stick it on my lap and color away in comfort.
When you want to stencil, the magnets will hold your stencil for you, no more having to use washi tape.
The magnetic ruler and the grid lines will help with layering your panels on your cards... I just can't say enough how much I am happy for this product.


*Photos are unedited, I wanted to give the real view, my stencil did not move, my blending worked as desired and now I have a project to finish with this panel.
Anyway, this new product is awesome, for sure a happy purchase for me.
9 more days left in my birthday month, wonder how many more fun things I can find.

I also finally bought the Vagabond 2 Die Cut Machine, OMG I am so mad I didn't ever get this before, die cutting is now a breeze, just pushing the button it pulls the sandwich through, hit reverse and hit again and it brings it back, OR, I could easily grab it from around the back instead... again LAZY. I sat here Friday and cut so many things for my upcoming cards and was just so happy. Some may wonder why I went with Vagabond over the Gemini... well, I have all the accessories (magnetic platform) extra plates, extended plates blah blah blah for the Big Shot already, which is what the Vagabond uses. I've had my Big Shot since mid 2015 so I didn't have to learn a new machine and new sandwiches and such.Sizzix Tim Holtz Vagabond 2 Electric Embossing Extended Platform and Java Standard Pads Die Cutting Machine, 6 In (15.24 Cm) Opening,
Anyway, signing off, I have a few cards to make to finish out the month and start on May, and with these 2 new products in my arsenal at least it will make it a little easier on me. It was always so much easier just to use my guilatine trimmer to cut the paper instead of using my dies to cut perfect panels, well not anymore... I'm kicking it up a notch starting today!!!

Friday, April 19, 2019

Easter Bunny Blog Hop

Greetings friends and fellow crafters, LeeAnn here with a fun project I made using some Lawn Fawn projects from my stash.

To make this card first I started with a sheet of pattern paper from the Doodle Bug "Hello Sunshine" paper pack. On top of that is a die cut panel that I used a combination of Tumbled Glass and Cracked Pistachio Distress Oxides and blended them together.

The jar is from the "How You Bean" stamp/die set along with using the add on die set which cut out the inside of the jar for a larger view.
I used one of the images as well as sentiment from the "Easter Party" stamp set, as my character.
In the jar is the "Rainbow Connection" sequin mix from KatScrappiness.
The grass and cloud washi tape is from Joann's.

I hope you enjoy this project and please hop along and see what the other designers have created for you today.
LeeAnn McKinney Mimis Crafty Abyss: <--- YOU ARE HERE

I SMELL JELLY BEANS- A STAMP DOCTOR PROJECT

Spring is in the air, bunnies are all around and Jelly Beans are on the scene. I'm not sure about you, but speckled Jelly Beans or plain black are my favorites.

Today I made a project using paper from the Easter Paper Pack 1, the Stitched and Nested Oval Dies sets, the Bunnies and Jelly Beans Combo,  and the Grass Edger Die.
I had so much fun making this card, and I hope you like it. It really didn't take too long once I had the idea of what I was going to do. I used LaLaLand Hybrid Ink to stamp my jellybeans. The Bunny is stamped using Memento Tuxedo Black as I knew I would be using my alcohol markers to color it grey.

Monday, April 15, 2019

Welcome Sweet Baby, an A2Z Blog Post

Greetings friends and fellow crafters, LeeAnn here and welcome to the A2Z Scrappbooking blog. I'm here today with an adorable Welcome Baby card I made for a friend who had a baby back in February. I am finally meeting her for the first time in a week and am so excited. I have so many cards made (I make them all the time, but never send them).
Anyway, on with the card... Using the adorable image from SugarTree Stamps Sweet Baby set I printed the image and sentiment, cut the image using my Scan N Cut and the sentiment with the Banner Die from the Hero Arts Ribbon Messages Stamp/Cut set.
The Ink I used is a combination of Hero Arts Passion Flower and Pink from the Clearly Kelly Miami Collection.. The ribbon and glitter dots are from my stash.
picsart_04-14-10.15.28

Are you on social media? We are! Please join us on Twitter, Instagram and Facebook? so you don't miss any fun promotions or new challenge announcements!
Hero Arts Monthly Challenge


a2z scrapbooking april challenge

Please join us in this month’s "Fun Folds" challenge for your chance at a free digital stamp  set AND, if you used Hero Arts or Sugartree Stamps, a $20 gift card to our etsy store. Our current monthly challenge can always be found in the menu bar, and runs from the 1st to last day of the month


a2z scrapbooking store hero arts


The a2z scrapbooking store carries a wide variety of Hero Arts products as well as a nice selection of digital stamps! Get discounted new releases, sales, grab bags & more. Proceeds from our store benefit Celiac & Behcets disease foundations. Use my discount code insert your code here to get 15% off your purchase of $25 or more. If you're looking for a Hero Arts product you don't see in store, use the Request Custom Order button from with-in the shop.


From A2Z:
SugarTree Stamps Sweet Baby
Other supplies used:
Hero Arts Ribbon Messages Stamp/Cut
Hero Arts Passion Flower
Pink from the Clearly Kelly Miami Collection.

Saturday, April 13, 2019

Hello Spring, So glad you have joined us

Greetings friends and fellow crafters. LeeAnn here with 2 cards I made using the Echo Park "Spring Showers" stamp set and some items from my stash.


 For this first card I stamped out my images, cut them and colored using Alcohol Markers. I decided then to use the Lawn Fawn Shadowbox Die set and create a fun card. I used GinaK Amalgam Ink to stamp my images as I knew I would be using the alcohol markers, and ScraPerfect "Best Glue Ever" to adhere my images within the card.
This card was so easy to making using the GinaK Designs Wreath Builder. I used the small images from the Spring Showers stamp set and repeatedly stamped using the wreath builder and my Tim Holtz stamp platform. I colored the images using my alcohol markers, cut 2 circles using  a set of dies from my stash and stamped the Hello Spring sentiment using GinaK Amalgam ink. I used foam to pop up the sentiment panel, ScraPerfect glue to adhere my layers together and with that my second project was complete.

Please follow along with  Scrapping For Less on All Social Media Outlets.

Sunday, April 7, 2019

You Are My Sunshine with ScraPerfect

Hi there friends. LeeAnn here with an encouragement card I made using The Best Glue Ever, Glitter, The Best Cleaner Ever, Gesso, Chipboard Elements, Distress Oxide, Acrylic Paint and a Stencil.

 First I coated the chipboard pieces with Clear Gesso.
 Once the Gesso was dry I covered it with Antique Gold Metallic Paint.
 From there I used Fossilized Amber Distress Oxide and a stencil from MFT to blend this ink background on yellow cardstock. I also added the Best Glue Ever to the back of my now dry painted piece.  
 Once my pieces were adhered to the panel I let the glue dry, which was really quick. While this was drying I cut my black cardstock layer and prepped my card base. 
Once this was completely together, I added my glitter to the center element, added a ring of The Best Glue Ever added the clear cap. While letting that dry I stamped out my sentiment, added a bit of the Antique Gold around the sentiment panel, adhered it with foam tape and my project was complete. I then used The Best Cleaner Ever to clean up my area.
I hope you have enjoyed this project today, as much as I have enjoyed sharing it with you.

Listing of products used in this project from ScraPerfect.
Best Cleaner Ever 
Image may contain: drink
Other items used:
Star Medallian Chipboard
MFT Rays Stencil
Distress Oxide
Folk Art Antique Gold
Clear Gesso

Saturday, April 6, 2019

Your Own Kind of Beautiful with GinaK and Scrapping For Less


Greetings friends and fellow crafters, Spring has arrived and I am excited to share two Spring Time cards I made today using GinaK Designs "Your Own Kind of Beautiful" stamp set I really love this stamp set and could not just stop with one card.


With this first card I stamped out the cacti and cut with my Brother Scan N Cut. I then used a banner die to cut a shelf. I used Distress Oxide in Cracked Pistaccio and a blender brush to make a background.Using Artist Loft Markers I colored up the images and after using stitched rectangle dies and ScraPerfect glue to put my layers together, I used foam tape to pop up the shelf and this card was complete. 


I decided I needed a little more fun with this set, and this bicycle reminded me of one I had in high school. Using paper from a 6x6 paper pad for my background and a Spellbinders window die,  to make this scene work. I colored the image with Artist Loft markers and adhered my layers using ScraPerfect glue. The bicycle is adhered using foam tape for pop.

Please follow along with  Scrapping For Less on All Social Media Outlets.


Thursday, April 4, 2019

Hippity Hoppity Stamp Doctor Project

Greetings friends and fellow crafters, LeeAnn here today with my newest project from The Stamp Doctor!!!

To make this project I used The Pop A Top 18 Die, Easter Paper Pack 1, Tiny Carrot dies, Egg Dies #1, Grass Edger Die and the Bunnies & Jellybeans Stamp/Die Combo.
First I stamped the bunny then used the Big Shot to cut all my pieces out. I colored the bunny and then stamped/colored the Jellybeans on the pop panel.
Once I layered all the pieces to make me happy, I used The Best Glue Ever from ScraPerfect to adhere all my layers down, and added an action wobble to the bunny so he can play in the grass while hunting eggs and jellybeans.

I hope you enjoy this post, please check out and follow myself and The Stamp Doctor on Social Media.


*Links to product in this post are affiliate links which will provide a crafty fund for me, at no cost to you.

Monday, April 1, 2019

A2Z April Challenge (Fun Folds)

Hero Arts Monthly Challenge       a2z scrapbooking april challenge   Please join us in this month’s "Fun Folds" challenge for your chance at a free digital stamp  set AND, if you used Hero Arts or Sugartree Stamps, a $20 gift card to our etsy store. Our current monthly challenge can always be found in the menu bar, and runs from the 1st to last day of the month.

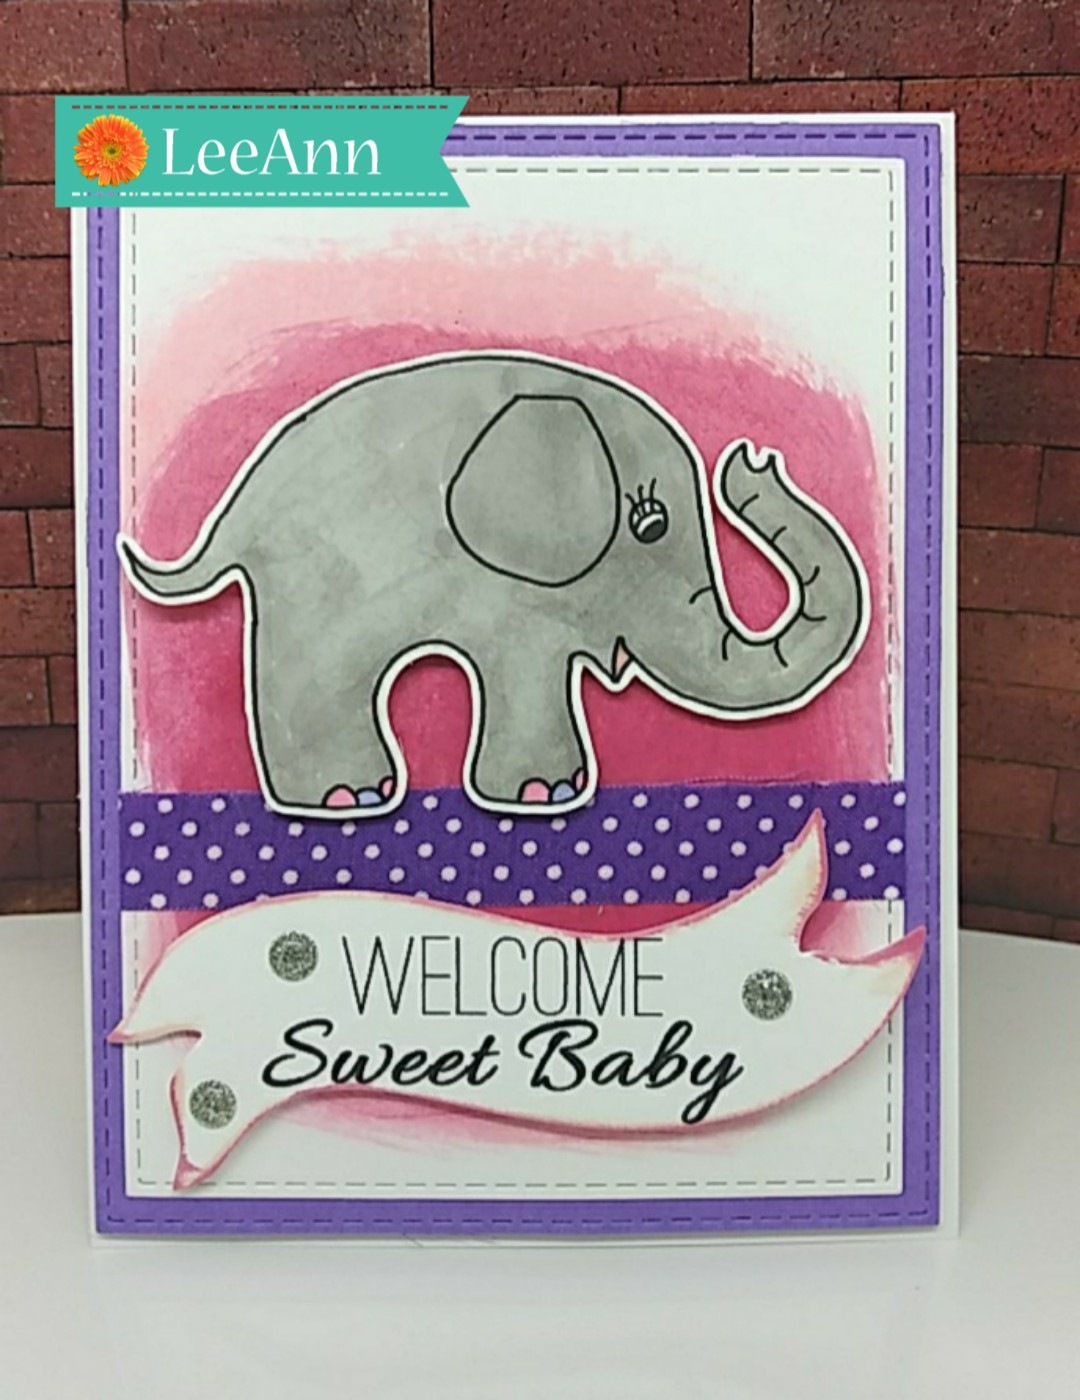
To make my project first I printed the image and sentiment from the Sugartree Digital Stamp set "Farmhouse"
I then used my Scan n Cut to cut out the image with a .04 border. Once complete I colored the image using Artist Loft Alcohol Markers (barrel E6 & E18, peaches YR15 & R3 with E10 for the stem)
The pattern paper for the front and the inside both are from the Jen Hadfield Everyday 6"x6" paper pad, and I thought these two would go great with the design.
For my card base I used an 4.25"x11" sheet of Recollections 110lb card stock. I measured in 2.75" from each end and scored down so that I would have 2 folds that met in the middle.
I cut the orange/white pattern paper 2.5"x4" twice for my two front panels. I then cut the wood grain piece 4"x5" for the inside. I then used a stitched rectangle die to cut the sentiment panel.
I used ScraPerfect Best Glue Ever to adhere my panels together and my final act was to add the bucket of peaches to the front panel, and a small piece of washi tape to the back of it so that it will stay closed.
My mom used to sing the Bushel & A Peck song to my girls all the time when they were young, and I do with my grandbabies now... this never gets old and is in the mail to my girls now, one card for each of them with little variations.

      a2z scrapbooking store hero arts      
The a2z scrapbooking store carries a wide variety of Hero Arts products as well as a nice selection of digital stamps! Get discounted new releases, sales, grab bags & more. Proceeds from our store benefit Celiac & Behcets disease foundations. Use my discount code insert your code here to get 15% off your purchase of $25 or more. If you're looking for a Hero Arts product you don't see in store, use the Request Custom Order button from with-in the shop.


  • FarmHouse digital image
  • Jen Hadfield Everyday 6"x6" paper pad
  • Artist Loft Alcohol Markers
  • Recollections 110 lb card base
  • Brother Scan N Cut
  • ScraPerfect Best Glue Ever


Are you on social media? We are! Please join us on TwitterInstagram and Facebook? so you don't miss any fun promotions or new challenge announcements!