Friday, September 29, 2017

Spreading Loving Kindness with KGC


Good Morning Crafty Friends and Welcome to Kennedy Grace Creations September Blog Hop!
We are so happy you have stopped by and joined us for this very special event!


Our newest release of Stamp and Sequins is now live and available for purchase in the store!


Here is what I have created for you

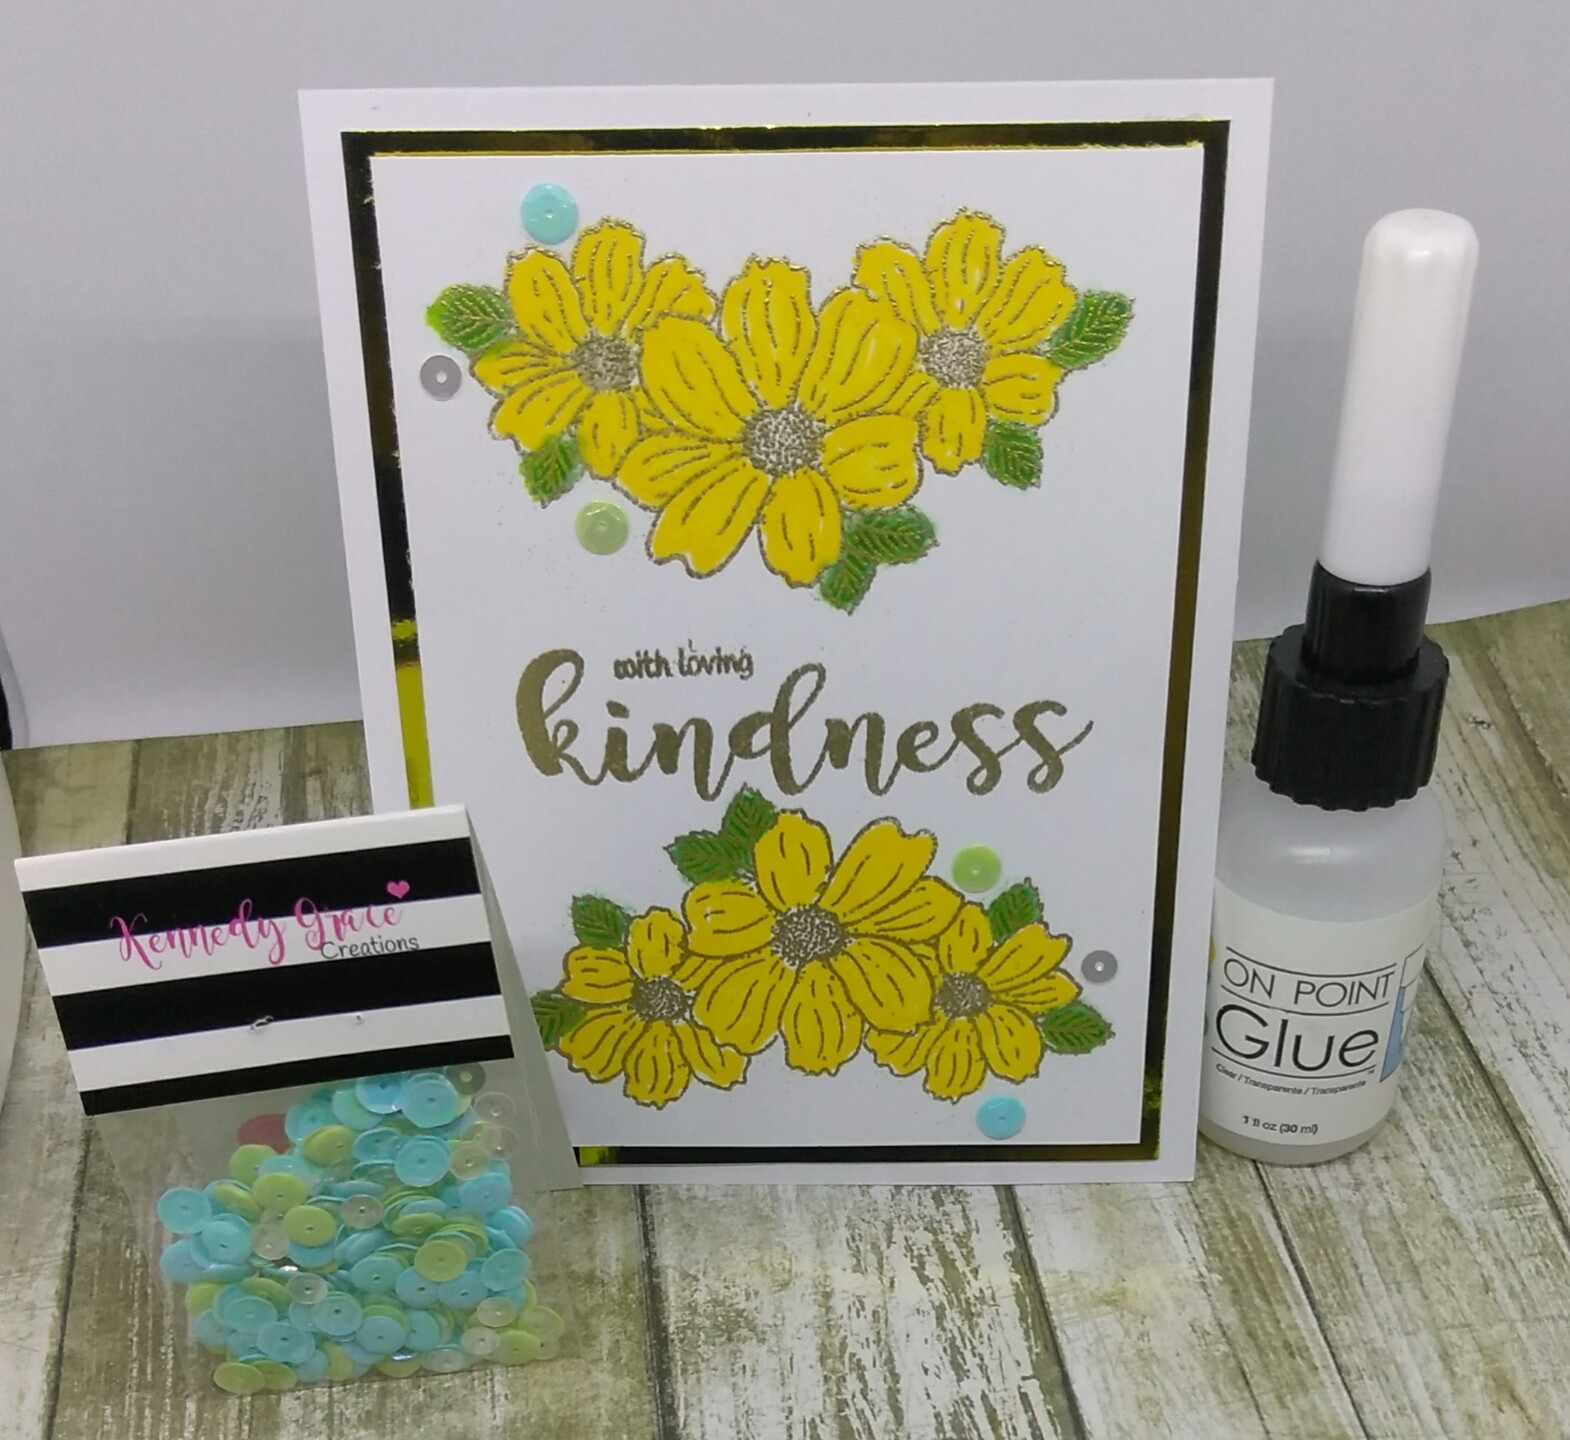
Greetings friends and fellow crafters, LeeAnn here today with my project for the Kennedy Grace Creations. For my project I used the Kindness Medley stamp set and sequin set by the same name.

The process of making this project is as follows...

1. Recollections 110lb cardstock panel cut to 3.75" x 5" and one cut 11" x 4.25" to use as my base. I also have 1 layer Jot Gold Mirror Paper cut at 4" x 5.25".

2. Using stamp platform of choice I placed my panel in the corner and positioned the flower stamp where I wanted it to be, I used my embossing buddy first where I planned on stamping, and then Versamark to ink up the stamp and make the impression on the panel, I then was able to turn the panel around and stamp the flowers again, and by doing it this way they were in the same position top and bottom.

3. I then used Recollections Fine Detail Gold Embossing Powder to cover the Versamark and a small paint brush to take away any strays.
After warming my heat tool up for about 20 seconds, I was able to warm the embossing powder to a pretty gold finish. I do start the warming from behind, then move to the front once the melting starts. This I have found over the years is the best process for me.

4. Moving back to the stamping platform I positioned the sentiment stamps where I wanted them. Ran over the area with the embossing buddy, and used the Versamark again, sprinkled on the same embossing powder, and warmed it to melt.

5. Once this part was complete, I used Memento Dandelion Marker to color the flowers and Cottage Ivy Memento Dew Drop with a Fantastix to color the leaves. I then went over the leaves with a yellow-green Wink of Stella glitter marker.

6. Now it was time to start putting the project together. Using my Score Board I made a score line at 5.5" mark in the 11" x 4.25" panel. This gives a great A2 base.

7. Using double side Tear It tape I attached the mirror panel to the base first, then used foam squares to attach the completed top panel to that.

8. My final step was to use OnPoint Glue to adhere the Kindness Medley sequins in the desired position.


9. Photos were then taken and edited with PicsArt app on my android phone.

I hope you have enjoyed my project today, please be sure to check out the posts from my team mates.

We will be giving away a prize package to one lucky winner.


All you have to do is join us for hop and leave a comment on each project. The more you comment the more chances you have to win!! Winner will be announced on Monday.

We hope you have enjoyed this release and will hop along to see what our talented designers have made using the Stamps and Sequins from our September release.
Your next stop is the lovely and talented:

  Chera


But just in case you miss some one along the way I have included the entire hop for you!

                                                       Donna


Thank you for stopping by today! 


Thursday, September 28, 2017

Quick Quotes Mini Album Fun!!!

Greetings friends and fellow crafters, LeeAnn here and I have to thank my friend Annie for this idea, as I was trying to think of a project to do which I had not done in the past, that would be fun for anyone to make. And this is such a fun and easy project.

To make this mini album I am using the Serenade paper pack. I really do love this set. Take a 12 x 12 sheet of cardstock and score all the way down on the 3", 6," and 9" marks.

Next you will turn the page one time, and again score on the 3", 6", and 9" marks; this will give you 16 3" x 3" boxes. 

The next step will be cutting and somehow I missed the photo on this one, but you cut like an M... in the first row cut up to the 3" line, the 2nd cut down to the 9" line and the last cut up to the 3" mark again. You will then start at the far left and fold up, when you reach the top fold under, then fold back down, fold under, fold back up, and repeat same for the last. You will then end up with a book similar to this image below.

Next step is to cut 2 pieces of chipboard at 3.25" x 3.25", and 2 pieces of coverstock at 4.25" x 4.25".

 You will then decide which side of the paper you would like to use as your cover, for this one I decided to use the light side as my cover since the inside pages are dark. Using double side adhesive I was able to adhere the cover to the chipboard all the way around.
 Another photo I did not take was the ribbon which I attached between the mini album pages and the covers. and this is the book with the covers on.
 Using 2 small strips .05" x 2" I made a binding in the back of the book so that it would not come apart here. I supposed you could leave this set up out and the book can open both directions.
 I then cut from the same cardstock used for the inside pages a 3" x 3" square for the front cover, and then used a tag from the kit. Using a Gina K Designs stamp and Mocha Mama Powderpuff Chalking ink I stamped the sentiment I wanted to use. The pearled brad is from a Quick Quotes kit from earlier in the year and this time I chose to leave it as the pearl color as it matches the original cover for this album.
              
 I really hope you enjoy this project as much as I did. Realistically it can be made in under an hour. Thank you for stopping by.

Items used in this project:
Serenade Paper Pack... September Club Q Kit
Mocha Mama Ink

Wednesday, September 27, 2017

Joy Clair Everyday Sets September Inspiration


Greetings friends and fellow crafters, LeeAnn here today with two inspiration projects using two sets from the Joy Clair August Release Rose Sentiments and Ugly Sweater Background Builder and Rinea foil papers as part of the Joy Clair/Rinea month long collaboration. 

For my first project today, started with an A2 card base made from Recollections 110 lb card stock. I then used a layer cut at 4" x 5.25" of Purple Rinea, and then Gold the next size smaller at 3.75" x 5". 
I stamped the Rose Sentiments frame on a sheet of the same 110 lb card stock and cut with my scan n cut. I used Spectrum Noir alcohol markers to color the roses and leave and used a Gold Sharpie on the frame. I stamped the sentiment using StazOn Black.  

For my second project today I used the Ugly Christmas Sweater set and Rinea Ghost ink, as well as Rinea Green foil paper. The background sweater paper is from DCWV 6x6 Fall pack. I used Kraft cardstock as my base.
I positioned my stamps in the mini misti and inked them up with the Ghost Ink, let me say this stuff is amazing. As soon as I had my impression made I used a baby wipe and the green foil came away where it was stamped.
I cut the foil piece 3"x4.35". The sweater layer is 4" x 5.25" and the Kraft base is standard A2.

I hope you have liked my inspiration projects today. I am going to have fun with this Ghost ink. It is specially formulated to work with the Rinea darker colored foils, and I feel it just adds that special touch a project can use sometimes.

Thank you for join us and don't forget to follow us on our social media venues to be the first to hear the news, sales, promotions and giveaways!
Thank you so much for stopping by today. Have a wonderful and blessed day!

Monday, September 18, 2017

Quick Quotes Coffee Lovers Blog Hop with LeeAnn

Greetings friends and fellow crafters. LeeAnn here today with my submission for the Fall Coffee Lovers Blog Hop. This is seriously the event I look forward to every quarter, and time sure did fly since the summer hop.

SO, on with my project... Using card stock from Serenade paper pack which is this months Club Q paper, I cut a base of 5.25" x 4", I then cut another at 5" x 3.75" to use as a top layer.

I then used Mocha Mama Powderpuff Ink to brush coffee stains through a stencil from my stash. I used a die from my stash to cut the coffee cup and saucer from Serenade paper again. The sentiment is from Joy Clair and stamped with Mocha Mama Powderpuff Chalk.

QQ Items Used...
Mocha Mama Powderpuff Ink
Serenade Paper Pack from Club Q

Sunday, September 17, 2017

Coffee Lovers Blog Hop, Sunsational Stamps

Greetings Friends and fellow crafters. Sunsational Stamps is a Super Sponsor for the Fall Coffee Lovers Blog Hop and I wanted to share my project with you today.


Using a clear stamp from Sunsational Stamps and stamped with Memento Tuxedo Black. I then colored it with my Zig Clean Color Real Brush Markers and used Memento marker to make the blood shot eyes. The sentiment is stamped with Quick Quotes Mocha Mama PowderPuff ink. The background paper is from DCWV Latte paper pack. My base is made with Recollections 110 lb cardstock. 

Friday, September 15, 2017

Joy Clair Fall Coffee Lovers Blog Hop 2017

Greetings friends and fellow crafters, welcome to the Fall 2017 Coffee Lovers Blog Hop. I look forward to this project every season and the challenge of coming up with new ideas using Joy Clair Stamps.


As a Super Sponsor, we are offering a $25 dollars Gift Certificate for this edition to shop with us at Joy Clair Store! Be sure to join in on the fun and link up your coffee loving projects to play along. We can't wait to see all the coffee loving creations.

Today's project I created using the new Joy Clair Coffee Sentiments set and continuing with this months collaboration with Rinea foil paper I used a small piece of the gold foil and the fabulous Ghost ink to stamp the sentiment. My card base is Recollections 110 lb Black, with a strip of DCWV pattern paper from the Latte Love 12" x 12" paper pack. The coffee jar is also cut from this same paper pack. The white panel is Recollections 110 lb white, that I ran through a Sizzix coffee stain embossing folder. The bakers twine is from my stash purchased at Dollar Tree. 


SPECIAL PRIZE!!!


Who wants a chance to win a SECOND $25 gift card to the Joy Clair store? All you have to do is comment on this blog and all the Joy Clair design team members' blog. The winner will be announced on the Joy Clair blog at the end of the month!


I hope you have enjoyed this bit of inspiration, don't forget to follow us on our social media venues to be the first to hear the news, sales, promotions and giveaways!
Thank you so much for stopping by today. Have a wonderful and blessed day!

Wednesday, September 13, 2017

Joy Clair Color By Faith Inspiration with Rinea Foils

Greetings friends and fellow crafters, LeeAnn here today with two projects using stamps from Joy Clairs Color By Faith line and Rinea Foil Papers.
I had never used this paper before, and I really do find that I like it. As you will see in my two projects today, the foil works great with both embossing folders and dies. For my projects today I used Be a Flamingo and Noah's Ark stamp sets that were in the August 2017 release.

For my first project "Be a Flamingo" I started with Recollections 110 lb white card stock, and cut to a2 size top folding card base. I then cut a layer slightly smaller at 4" x 5.25".  My layer of Rinea paper is 3.75" x 5" and embossed with a cloud embossing folder and affixed with double stick tape. I used a cloud die to cut the waves from dark blue foil paper and the gold is to be the sandy beach.
I stamped the flamingo and cut her out with my Scan n Cut 2 machine, I really love being able to stamp and scan my images, however with each stamp set purchased from JoyClair.com you will be emailed the electronic file to cut the images with your cutter of choice (Silhouette/Cricut/Brother).
My Flamingo is stamped using Memento Tuxedo Black and the sentiment is stamped using Ranger Salmon. I used my Spectrum Noir Markers to color the image.  Along the bottom of the card I stamped the birds from the Song of Solomon stamp set which was released in 2016. I thought of these little birds as soon as I saw this stamps set was coming out, and knew immediately my project would be similar to this. The birds are stamped using Staz-On ink.

My second project today is using Noah's Ark. The background while I would love to take credit for the stormy look, is from the DCWV "the Girlhood Stack" released in 2012. The rainbow is from a DCWV 8x8 pad however I can not find the name of it at this time. And cut with an MFT die.
The clouds and sentiment were stamped using Memento Tuxedo Black, the ark was stamping using GinaK Honey Mustard. The clouds were colored using Stormy Sky and Broken China distress Inks. 
The water waves were cut using some wave dies from my stashed, and it was all put together on an A2 card base from Recollections 110 lb card stock. 


Sunday, September 3, 2017

StyleTec aka Tape Technologies Helping Me To Organize My Design Team Projects

Greetings friends and fellow crafters, LeeAnn here today with an idea I had to keep my design team products straight each month.
This Iris box measures 13"x13" and is 3" deep. I used the software for my Silhouette Cameo and using the Tape Technologies by StyleTech vinyl in Glossy I cut each of my design team names, as well as some fun crafty products that I made within these teams.


Using this box each month I be able to keep the items I need for my projects together until they are complete. This way if we decide to travel I can pretty much grab and go.

Please be sure to check out the other design teams posts and see the wonderful creations they have made as well.

Marilyn
Janet
Penny
Emma
Anita- will be live on Sept 5